Wednesday, December 22, 2010

Teacher Gifts


This year, for the 3 main teachers that 2 of my kids have, I decided to make drink coasters for them to keep on their desk. I really wish I had a better picture for the one coaster. My 7 year old drew a picture of the two of them together. It was so adorable. For teachers we had in the past, I made these super simple Thank You cards. Each of those teachers received 10 cards.

Saturday, September 25, 2010

Pumpkin Patch 2010!


It's that time of the year again! Get ready for Halloween treats! Now, anyone who knows me, knows that I am frugal. Last year, around this time, my husband's work hours were getting cut and we still have kids who want to take treats into school. So, I had to think fast how to do something adorable but with little money and little time. I made a Pumpkin Patch...and this year, I will show you how.

Items you will need: Styrofoam block, Mod Podge, Circle Punch, Paper, Ink, Stamps, Scissors, Adhesive and Suckers.


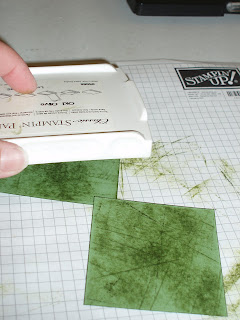
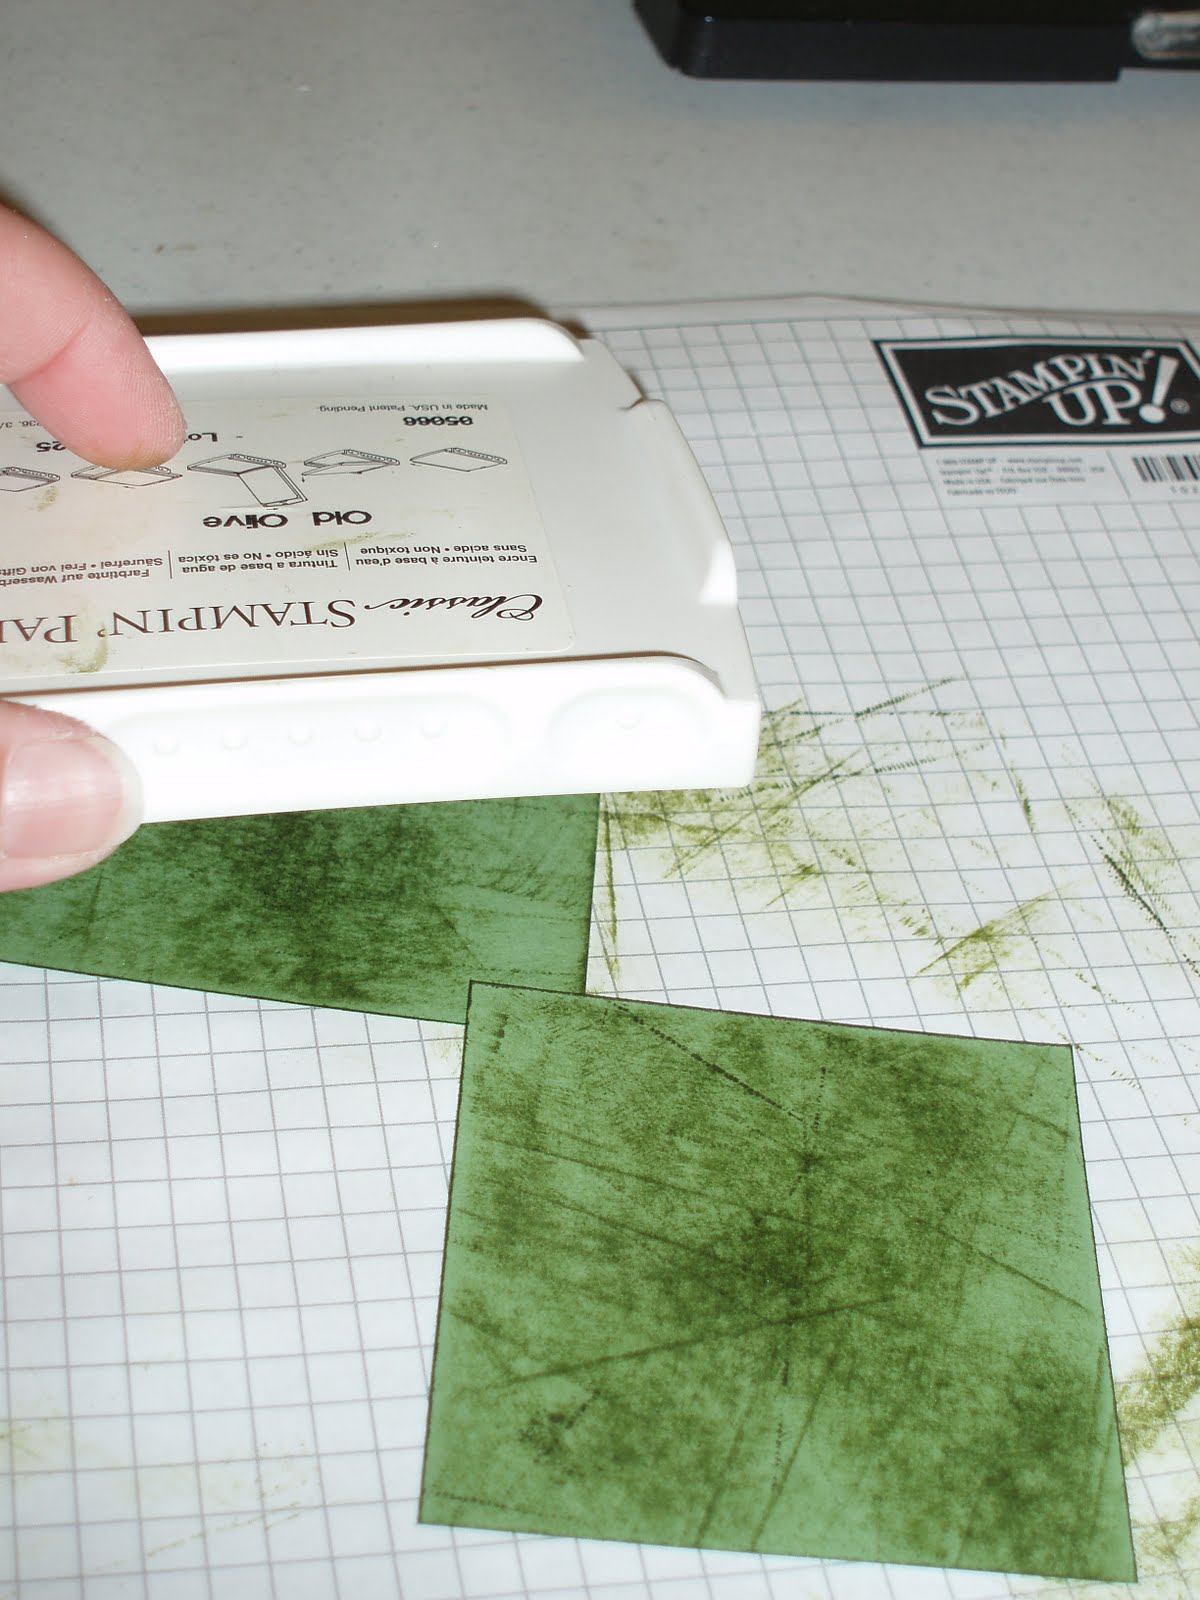
Step 1. Cut out 4 pieces of paper that match the size of your block. This will be your grass. Do not cut a piece of paper for the top surface. You need to be able to push your sucker sticks in there easily.


Step 2. Rub your ink all over your cut paper to give your grass some definition. I used a shade darker than my paper.


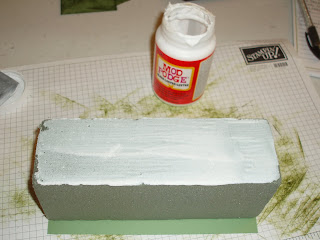
Step 3. Cover your block one side at a time with Mod Podge and glue your paper down. It will be much easier if you let each side dry completely before moving onto the next side. *Note: You may need to put a heavy book on the glued area to keep the paper flat against your foam block.


Step 4. While the glue is drying, begin punching out your circles for the pumpkins and stamp your images on the circles.


Step 5. Glue your pumpkins onto your suckers with regular adhesive.


Step 6. Now that your grass is glued to your foam block and is dry, go ahead and cut slits into the grass and fan it out by brushing your hand gently over the cuts you made (think preschool days here).


Step 7. Push your suckers down into your block and different levels and you have created your pumpkin patch!

Wednesday, September 22, 2010

Altered Clipboard


It has been quite a while since I have found time to craft and I am so happy that I did. School is back in session, which leaves me with just one more at home while the other 3 are gone all day. I have finally found some "me time".

I decided to make an altered clipboard for the first time. Yeah, I know, it took me FOREVER! Now I want to hit Dollar Tree and get more of these gems. I just covered it with some Mod Podge, card stock and added my picture. More Mod Podge was added over the entire clipboard for protection. Hope you like it. This is my 2nd child, Hanna.

Monday, July 26, 2010

Baby Shower


This is a simple and cute card I created for a baby shower a friend is going to. I used "Hello Baby" from TAC. I love that set for baby cards. Hope she likes it!

Monday, July 12, 2010

Firecracker Bakery


If you are local to the Cincinnati area, you MUST contact Firecracker Bakery for your next event if you are looking for cookies, cupcakes or a cake. I went to school with Lynn, the owner. I recently got in touch with her to make a cake for our 15th wedding anniversary. Words can not describe the taste of our cake. Weeks later, we are craving it again. LOL!!!! You can purchase some of Firecracker Bakery's cookies if you stop in Book Bums in West Chester.

Here is a picture of the cake Lynn made for us. To. Die. For!

Saturday, July 10, 2010

BOLD BRIGHTS


I am so not a fan of bold bright colors...USUALLY. Now that Stampin' Up! has revamped their Bold Brights line, I am in LOVE! I found this card while blog surfing on THIS blog. I love this card, it uses one of my favorite stamp sets, Boho Background, but I wasn't sure which colors I was going to use. So, I used Real Red, Daffodil Delight, and Tempting Turquoise.

Monday, July 5, 2010

Happy Birthday Party Starters!!!!


Do you want a chance to win great prizes? Head over to Party Starters Blog and wish them a happy 1st birthday! See how you can get entered to win a fabulous prize!!

Remember, Party Starters made the awesome cake for my daughter's birthday this past year and she was in LOVE with it!! So was I, of course. I still smile when I see this picture because of how happy Hanna was.

Sunday, June 27, 2010

Happy Birthday!


I am always running out of birthday cards so I need to build up a stash. Here is the first of many that I am creating. Very simple. All SU products are used.

Saturday, June 26, 2010

These Three Words


This is a simple card I created using the SU stamp set These Three Words. I made this card to give to a few friends who helped make my idea of a memory garden come true for another friend of ours who lost her sister.

Father's Day Card


I am not very good when it comes to making masculine cards, but I needed one for Father's Day and this is what I came up with. All supplies on this card are made using non-Stampin' Up products and images.

Friday, June 18, 2010

STAMPIN' UP! SPECIAL only through me! *EXTENDED*

Between now and June 29th, place a Stampin' Up! order through me of $50 (before shipping and taxes) and receive a voucher for a FREE pack of 8.5 x 11 paper in JULY. Place an order of $100 or more (before shipping and taxes) and receive a voucher for 2 FREE packs of paper, or 2 FREE Classic Ink pads (you can mix and match one of each if you like) in JULY. Hit CONTACT ME (under the ABOUT ME button) if you are interested.

Happy stamping!!!
Karie

Tuesday, April 27, 2010

May is National Scrapbooking Month


Here is a flyer you can view for the May specials! Enjoy!

Saturday, April 24, 2010

Awash with Flowers


Here is yet another card I have made with the Awash with Flowers. This card is a total case by another Stampin Up! Demonstrator. You can find her blog here.

Voila!


Thanks to my girl, GQZMOMMY, I was inspired to bust out my Chef. I love him, but can never think of enough crafty things to do with him. GQZMommy made this card and it gave me some great inspiration.

Monday, April 12, 2010

Sense of Time


I am always at a loss when it comes to making masculine cards. I have had this stamp set for quite some time now and have never used it. I had a little time to stamp today (realized, the day is loooong when you don't take a nap after the kids leave for school) and decided to ink this bad boy up.

Sunday, April 11, 2010

Awash with Flowers #2


Here is another card I made using the "soon to be released" stamp set, Awash with Flowers. I think this will quickly become one of my favorite new sets! I am so not a flower person either.

I used So Saffron, Whisper White, Certainly Celery, Perfect Plum and Pink Pirouette.

Awash with Flowers


This is the card I created with the NEW Stampin' Up! stamp set, Awash with Flowers which will be in the 2010-2011 catalog. I also used colors which will be part of SU's everyday colors. I used Bahama Breeze, Pink Pirouette and Chocolate Chip. I am in LOVE with this set and I am not really into flowers. I can't wait for the new catalog!

Tuesday, April 6, 2010

Sometimes, you have to kiss a frog to find your Prince

And the same goes for card making. I was asked by my friend to make 40th birthday invites for her DH. I needed to keep them simple since I was making so many of them, and since it was for a guy, an outdoor picnic party as well. I made 3 designs (my frogs) and didn't like any of them.


Frustrated, I went to bed. Woke up and made the 4th...my prince of a card. LOL!!! Finally, one I am happy with. I will not think about this anymore. After I "mass produce it", I will not change this card.

Saturday, April 3, 2010

Happy Easter!


Here are 2 Easter boxes I made for my Niece and Nephew. I used the Top Note die from Stampin' Up. Super simple and easy! Enjoy.

HERE is the blog where this idea came from. Too stinkin cute! And now, after I finished mine, I realized what I had forgotten with the eyes and why it looks so different. LOL! OH well, next year...there is always next year.

Tuesday, March 16, 2010

All Aboard!


Since I was making trains, I decided I would use Billy, from Pink Cat Studio and make another card.

Chooo-Chooo!!!


Well, I finally used my Cricut Expressions my wonderful husband bought me for Christmas, 2 years ago!!!

A great friend of mine asked me to make some train invites for her son's birthday party. She had no other request other than trains. So, not only did I use my Expressions for the first time, I also purchased something off of Ebay for the first time. I found this cartridge at Michaels for $69.99 then my hubbs told me to search e-bay...a place I never look. Low and behold, I got it for $30.00, free shipping!

So, here is the card I created with it, then saw an empty picture frame laying around and thought I'd keep going with my cricut. When I finished with that, I needed a bag to put the frame in, so I made the bag myself out of 2 sheets of 8.5 card stock and added another cricut train to it. I love it!

Friday, February 19, 2010

Simply Sent Card Kit


You have to love being the hostess of a workshop during Sale-A-Bration from Stampin' Up! I had so many free items, it was hard to pick what I wanted. With some of my free merchandise, I picked a Simply Sent Card Kit. I have never bought one (shame on me, being a demo and now knowing my product). I was in love finding the beautiful box and all the items inside. You get EVERYTHING you need to make 10 cards. You get your stamp set, card stock the ink, adhesive, ribbon, emblies, evnies...and instructions! I highly recommend a Simply Sent Card Kit for any new stamper.

It's all about the attitude!


I used Lilly from Pink Cat Studio, she is FABULOUS! The patterned paper I used is retired SU paper, but the challenge was to use items you hoard and I hoard brads, ribbon and patterned paper. I used all 3. YAY ME!!

Sunday, January 24, 2010

Tote-ally Tess


I am in LOVE with this Tote-ally Tess stamp set. This was my first purchase from SU in the clear mount style. I have to say...LOVE IT!!! I was afraid the stamp image would be blurry like I have experienced with another company's stamps, but it isn't. Not one bit.

If you can see, the card that "Tess" is holding, the front is the same pattern as the little strip on the side of the card. I love to paper piece and that's what I did here. I also did that with the purse using CS that matches the colors of the strip on the side.

Friends 24/7


I have been totally inspired by looking at Stampin Kub's blog. I love his simple, yet very elegant white cards. I decided to start trying this out myself and seeing where it takes me. No, I'll never be a Stampin Kub, but I do really, really like the way this turned out.

The flower is from Stampin' Up's, Friends 24/7 set. I added some glitter to the edges of the flowers and on some of the leaves, but you can't really see it from the photo.

Monday, January 11, 2010

Party Starters Team Jacob party pack!!!!


Anyone who knows me, knows how much I love Jacob Black (Twilight). Anyone who knows me knows that I think my friend Pam is super talented. And, if you already know me enough to know those things about me, you know me enough to know I'm going to talk, talk, talk about anything I love. Pam is one of the founders of Party Starters. They make gorgeous party packs for any occasion you can think of. You might remember that Pam made this adorable Hannah Montana party cake for my daughter. Well, they are at it again!!!

Check out THIS Team Jacob Party Pack!!!! How can you NOT love this???

Look at the detail in this! The background is pages from the book! Oh, how I love this! Way to go, this is awesome!